Tuesday, April 24, 2018
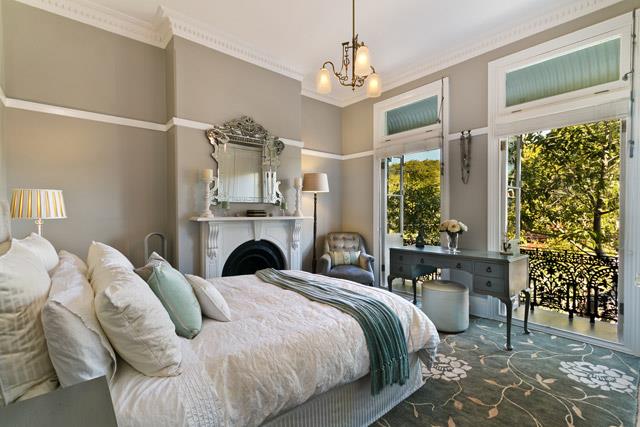
In the past, installing cornices was a job best left for professional carpenters. However, with the lightweight polystyrene cornices now available, installation is quick and easy – just measure, cut and glue into place.
Warren Budde from building material supplier, Swartland, says their new range of polystyrene cornices come in a wide variety of stunning profiles, and they are affordable, lightweight and supremely easy to cut and glue into place.
He goes on to add that aside from adding the finishing touch to any room’s interior, cornices are also handy as they can easily hide speaker cables, security wiring or any other cables for that matter. “Instead of having to chase these cables into the wall, which is a time consuming, messy and expensive job, it is far quicker and easier to run them along the ceiling’s edge and cover them with attractive cornicing instead.”
Here are an easy DIY guide…
What you need
 Aside from adding the finishing touch to any room’s interior, cornices are also handy as they can easily hide speaker cables, security wiring or any other cables for that matter, says Warren.
All you will need to undertake a DIY cornice installation is the following materials and equipment:
Before you begin
The first thing you need to do is to measure out the room in order to determine the linear metres of the moulding required. Swartland’s range of polystyrene cornices comes in standard lengths of 2m. Warren advises to add 10% to 15% onto the total length calculated to accommodate cutting wastage.
Once you have purchased all the materials required, you’ll need to move all the furniture, décor and soft furnishings out of the way, and cover them with an old cloth for protection. Then you need to thoroughly clean all the relevant surfaces (wall and ceiling) so they are entirely free of dirt or any loose particles. Ensure the area in question is completely dry before installation begins.
How to do it
As with most things, Warren explains that if you spend time preparing well for the job at hand, then the installation will be easily concluded.
Follow these straightforward steps for a successful job:
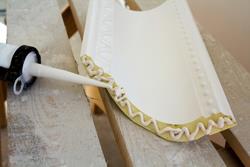
 It is important to cut all the moulding to length and mitre all the necessary corners beforehand.
Measure a straight line: Before you can start, it is essential to mark out a straight line that runs between the ceiling and the wall to ensure that the cornices are installed correctly. To do this, test fit a piece of moulding in place, and using chalk or a pencil, mark the height of where the moulding meets the wall below the ceiling, and where it meets the ceiling above the wall. Then, using a spirit level or a laser level, extend this mark along the entire length of the wall and ceiling surfaces from corner to corner, all the way around the room.
“If you find that your ceiling or wall is not perfectly straight, measure from the lowest point and straight across. Then you can install the cornices along the straight line and fill the gap with glue,” says Warren.
Cut to lengths: It is important to cut all the moulding to length and mitre all the necessary corners beforehand. Mitre boxes make easy work of mitring the cornices. Before you begin, you need to set the bevel angle of the mitre box at 45 degrees, and leave the bevel setting at this angle throughout the entire job. Set the saw at 45 degrees right to cut the pieces that will form the right inside and the left outside corners. Then set the saw at 45 degrees left to cut the left inside and right outside corner pieces.
Warren offers a tip: “The key to successfully mitred corners is placing the moulding correctly in the mitre box – the moulding should be placed in the box so that the ceiling bedding edge of the moulding lies against the bottom of the box, and the wall bedding edge lies against the side of the mitre box opposite you.”
He says, in most homes, you will find that the corners are rarely perfectly square, and so in order to avoid waste, it is prudent to cut the corners and glue them together before installing them in place.
 Once all the various lengths have been cut, and the corner pieces have been cut and glued together, it is time to permanently glue the cornices into place.
Glue into place: Once all the various lengths have been cut, and the corner pieces have been cut and glued together, it is time to permanently glue the cornices into place. Using a caulking gun filled with acrylic cornice adhesive, apply a continuous bead of adhesive along the backside top and bottom edges of the moulding, as well as along both butt joint ends. Then gently press each piece of cornice into place and hold for a bit until the adhesive sets.
“For longer pieces, you may need some help holding the cornice in place while you wait for it to set,” says Warren. However, if you are on your own, then you can always use masking tape to hold each piece in place.”
Finally, for a neat result, it is essential to wipe away any excess adhesive that spills from the edges or seams using a slightly damp sponge or cloth.
Fill in the gaps: Once all the cornices have been glued into place, you will be able to spot where all the gaps lie. You can use the adhesive to fill in these gaps – simply apply adhesive to the area in question, and smooth out excess with your finger or a putty knife to give it the appearance of being part of the moulding. If the finish is slightly rough when dried, then you can sand it down with fine sandpaper for a smooth and professional end result.
Paint them: Once the adhesive has dried completely, then you can paint the freshly installed cornices, says Warren. “Remember - when painting polystyrene cornices, you can only use acrylic paints or solvent-free water-based enamel paints.”
Visit www.swartland.co.za to find a retailer that stocks the new range of polystyrene cornices.